
If you are bored of using your normal iphone. Then this blog is for you only. In this blog we will tell you how you customize your iPhone with diamonds and gold. Which really gives you a very rich and luxury look.
As you all know, iPhone has become very normal in today's time. There was a time when having a iphone was considered very unique in itself. So the question is, how can you give your iPhone a unique and luxurious look to others? For this, you can decorate your iPhone with gold and demand or other precious metals as per your choice.
There are many ways to customize your iPhone. You can customize the entire body in gold or platinum And you can install diamond pieces inside it which will be seen shining through the door and it will look very nice. Or you can change only the side buttons with buttons made of expensive metal, this will also look very good.
Transforming a Damaged iPhone 12 Pro Max into a Luxurious Masterpiece
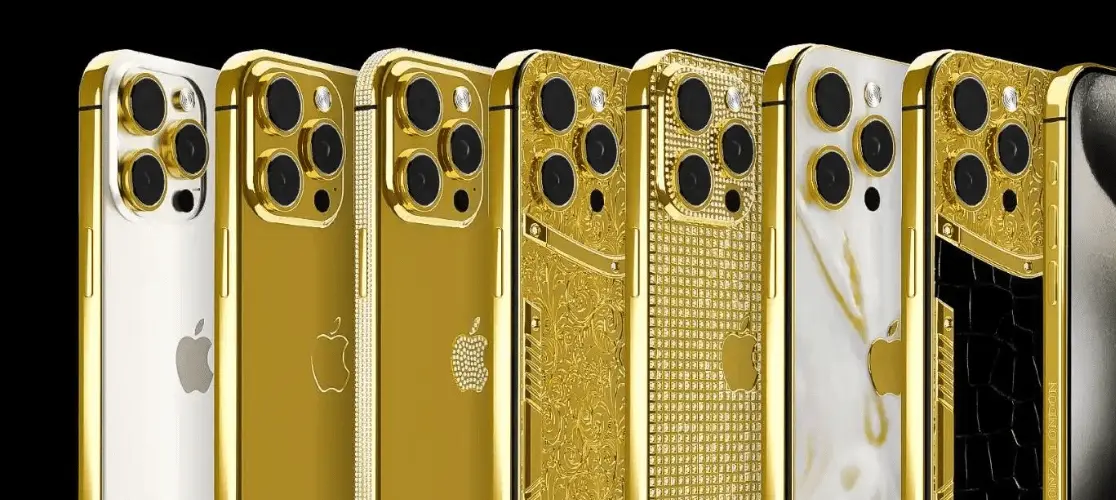
Hi guys, welcome back to another Blog. In this Blog, we're going to be transforming a damaged iPhone 12 Pro Max into the ultimate piece of luxury technology. While the iPhone's design is respectable, it doesn't stand out amongst the millions of identical phones. To give it the edge it needs, we'll be installing this new exquisite gold-plated housing inlaid with diamonds. This mesmerizing housing is sure to catch the eye of everyone who sees it.
Inspiration and Goal
The housing is modeled after the Caviar Solid Gold iPhone, which costs $64,646 Australian dollars. Can we achieve this look for less? I want to find out. The housing in its current state is completely empty and we'll need to have every part of our phone transferred into it. From the logic board and cameras, down to the antennas and metal grills in the speaker ports. It's for sure going to be a big undertaking and to do it right, I'm going to need to have the right tools for the job.
Tools and Preparation
This includes my iFixit ProTek Toolkit which houses all the bits and tools needed for this conversion. If you're looking for your own toolkit or parts for your next repair, visit iFixit.com or visit the link in the description.
Disassembling the iPhone 12 Pro Max
To begin, I'll unfasten the two Phillips screws from the bottom of the iPhone and place the device on a heat plate for several minutes to soften the adhesive holding the screen in place. Afterwards, a suction cup can be used to lift up on the display in an effort to create a gap between the display and frame. It took a few attempts and some reheating, but eventually a gap formed. With the plastic pick inserted, it can be worked around the display to cut through that adhesive and unlatch the display's clips.
Internal Components and Challenges
Starting with the iPhone 12, Apple has increased the water resistance on their phones. However, this has made the phone much more difficult to open. With the screen loose, it can be folded to the left-hand side of the phone to reveal the internals and the display's cables. From here, we'll need to remove all of the tri-wing screws securing in two brackets covering each of these display connections. Once the brackets are free, I'll firstly disconnect the battery before unplugging our front display panel. With the display's cables unplugged, the screen can be lifted up and away from the phone. This gives us our first look inside the iPhone 12 Pro Max.
Disassembly Process
Following the display's removal, I'm going to unfasten the SIM card reader and remove it from the phone. There is a flex cable connecting it to the motherboard which means not only is it replaceable, but you can install a dual SIM card reader to allow you to install two SIM cards into your iPhone. I've demonstrated this in a previous video with an iPhone 12.
Logic Board and Components
I will continue the disassembly by unplugging all of the flex cables connecting to the logic board. There is a total of 14, not including the display cables we removed earlier. Proceeding, there are two stand-off screws that will need to come out before we can remove the entire logic board from the phone. Getting a closer look at the logic board, you may have noticed the absence of a connector at the top right. This is only populated on the US models that have extra antennas for 5G mmWave.
Camera and Sensor Removal
The cameras and LiDAR sensor are to come out next. The LiDAR is secured underneath a bracket and glued to the back casing. With those out, the front-facing camera can come out and we can proceed to the lower portion of our iPhone 12 Pro Max. Here I will unfasten the Taptic Engine and speaker which will need to be removed in order to gain access to the battery release tabs. These tabs need to be removed carefully otherwise they will break off leaving the battery stuck inside the phone.
Battery and Charging Port
The best way to remove them is to ensure you are pulling them out horizontally and continue pulling them as close to the battery as possible, limiting the chance of it breaking off at the end. At the top, things are a bit different. There is nothing to remove to gain access to the battery tabs and with only about 5 mm between the battery and a welded bit of metal, I couldn't find a way to remove them, so I resorted to just lifting up the battery. Thankfully there was minimal adhesive at the top.
Installing New Housing
Back down at the lower portion of the phone, with the battery removed we can now get out the charging port assembly. There are a lot of screws of various different types that need to come out in order for it to be removed. Thankfully my Pro-Tech toolkit has the Tri-Wing, Standoff, and Philips bits to tackle this. Also holding this charging port in place is the plastic guides for the microphone and speaker. With the work of my Jimmy tool, I can pry them free. The speaker guide put up a real fight as it's been attached with some really strong glue.
Reassembling the iPhone
Proceeding we can remove the volume and power buttons. These are all connected to one flex cable that also attaches to the wireless charging coil. It's vital that while doing this conversion I don't damage anything, as many of the parts, even if replaced with brand new ones from a brand new phone, are prevented from fully working.
Final Touches
The wireless charging module is difficult to remove without damaging it. It's covered by a graphite sticker which can be very easily damaged. Minor damage to that sticker is inevitable, but it doesn't impact the function of the coil. Below it is a series of magnets used for Apple's MagSafe accessories. These are heavily glued down and snap in half very easily. Back up at the top, the LED flash and rear microphone need to come out next. After removing all the tri-wing screws, it will need to be pried out.
Organizing Parts and Reassembly
It's important to be gentle on these cables as you can slice through them with ease. Having done it myself, it causes a whole week's delay as you need to wait for the replacement part. If you don't organize all the parts you removed properly, it can be a real pain to get it back together. In the crevice next to the camera lens is yet again another antenna. This time it's secured with Phillips screws. Apple is constantly interchanging between these two screw types.
Final Reassembly
I wonder what their decision behind it is. Is there an advantage to using one over the other, or is it just another way to complicate repairs? I find a lot of the common things people would replace such as the screen, charging port, and cameras use the tri-wing security screw. But some of the antennas and rarely replaced parts do not. Even the screws on the outside of the phone are security screws designed by Apple. After all the antennas are out, there are only a few things left inside this housing. Those include the metal display clips and the volume and power buttons themselves.
Conclusion and Testing
I'll start by removing the display's clips, and then these two gold contacts which sit behind the face ID module. Lastly, I can remove the spring and retaining clips from the back of each button. This can be achieved using a pair of tweezers and a metal pry tool. With those clips removed, each button can be pushed out of the frame and have each of its rubber grommets removed from it. This is a tiny and complicated process that isn't strictly necessary, although it helps keep dust and water out of the phone. And with that, we've now fully disassembled the iPhone 12 Pro Max.
What are your thoughts so far? I don't think this phone was intended to be fully disassembled. To keep everything organized, I've used two magnetic mats. This allowed me to lay the components out and have their screws stay put and not go rolling off my table. It's finally time to grab our new gold and diamond housing to put all the parts we just removed into it. I'll start with the MagSafe magnets. While I'll be installing them, they'll no longer have any function, just like the wireless charging coil.
Both of these systems won't work when you replace the glass with a thick piece of metal. It's now time to prep the buttons before we install them. Using those rubber grommets we removed earlier, I'm going to put them on each of the pegs of each button. Each of the prepped buttons will now be installed into the frame. Our new housing is still covered by a lot of protective film, which I'll be leaving on for the duration of the assembly process. This means we won't get to see the full beauty of this phone until we're done.
I'll now reattach the retaining bracket and metal spring to each button. Proceeding, it's time to get the display clips reattached. It's vital to install these the correct orientation, or you'll assemble the entire phone only to realize the front display panel won't go on. Next, I can go ahead and attach the WiFi antenna back into place. It'll be interesting to see how these antennas perform. Does the metal backplate have an impact on WiFi range, or any other antennas in this phone? I guess that's something we'll have to see once we get the phone reassembled.
Continuing with our assembly, I'll install the LED flash, rear microphone, and the antenna going beside the camera assembly. I'll also install the metal contacts going behind the Face ID module that'll match in nicely with our new.
Realated Blogs : Top 8 Cheapest 5G Mobiles | Lamborghini Mobile Phone | Exploring the Potential of the iPhone 16
Categories: Mobiles